The Agent Portal consists of several views that can help to work with users' part confirmation requests efficiently:
- List of Help requests
- Status of Expert Help requests
- Information provided in individual Help requests
To learn how a Customer Service Agent can manage Help requests see How to confirm a part for an Expert Help Request.
List of Help requests
The Agent portal provides a section to access all the requests submitted by users. Only those users with the corresponding permissions can access this list. Moreover, the list is limited to organizations the expert Agent is assigned to support. Learn more about permissions at Data access by groups of users.
The Help requests page lists the following data in the rows:
- Request ID
- Status of the request
- Request date – when the request was submitted.
- Closed date – when the request was resolved (if resolved).
- Request type – shows which type of the request was submitted. See types of requests in Get started with Expert Help Requests.
- Contact – shows the email of the user who submitted the request.
- Organization – indicates the organization of the user who submitted the request.
The list can be filtered with the following parameters by choosing the corresponding selector:
- Organization
- Status
- Request period
In addition, a text search allows filtering the list of requests keeping those where the search matches the Request IDs, Contacts, or Organizations.

By clicking on the request ID, the app opens the Expert Help request page. You can learn more in the section Information provided in individual Help requests below.
Status of the Expert Help Requests
The Partium Agent Portal offers four statuses that help monitor the work that is pending and what has been accomplished by the team of Customer Service Agents.
The four statuses are:
- New: this is the status for as long as the Expert Help Request has not yet been consulted by any user.
- In progress: this is the status that the request holds as soon as anyone consults that request.
- Resolved: the user who consulted that request was able to find a match and confirm a part for that Expert Help Request.
- Not Resolved: the user who consulted that request was able to confirm that there's no possible match in the catalog for that request.
Each status is visible in the details of the request and has a different color to help visualize them more easily.
Information provided in individual Help requests
The Agent Portal is divided into two sections:
- Left Pane: presents tabs with the results of the search session for the person requesting assistance, as well as the search capabilities for an expert (A).
- Right Pane: presents the details of the request for expert assistance (B), or the details of a selected part (C).

Below, we describe each element and mark with “[auto]” those fields that are automatically populated by the system and confirmed by the user when submitting. To learn how a Customer Service Agent can manage Help requests see How to confirm a part for an Expert Help Request.
A. Expert continues a search
This part of the interface consists of different tabs, each being a separate search session where the expert can perform different actions.
- Requester search tab [auto]: This tab contains the search results that the requester received by the time the user submitted the request.
For each result in the list, the UI presents:
-
- Part Thumbnail (if available)
- Part ID
- Part Name
- Part to confirm (if applicable): in case the submission was of the type Confirm Part (see section Types of requests for expert assistance in Get started with the Expert Help Requests), the part to confirm is marked with the badge “Part to Confirm”.
By clicking on any part in the result list, its details are shown in the right pane. Click back to return to the list of results.
- Invite button: This button initiates the creation of an email if the Service Agent needs to request help from another expert and collaborate on resolving the request.
- A copy-plus icon inside of any tab: This element allows to continue a requester’s search. Clicking this button creates a new tab and triggers a new search using the same input as used in the tab that is being copied.
- A plus sign next to the last tab on the page: This element allows to start a blank search in the help request interface. An expert clicks on the plus sign following the last tab. This action creates a new tab with a blank search widget.
- Search result panel: This panel appears in every tab and displays the input parameters chosen for the search when the tab is opened by any user. In the case of the Requester search tab, the panel shows the search input applied at the time the user submitted a Help Request.
- If filters are used when the expert continues a search, the filters panel appears on the right side, providing the option to select them.
B. User Request
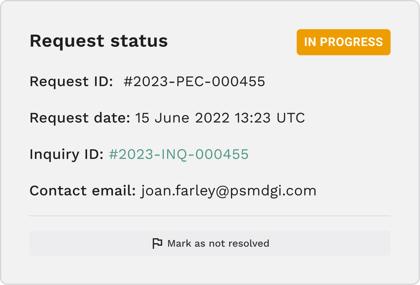
- Requester details [auto]: Contains the Request's current status, unique Request ID, Request date that indicates the date and time when the request was submitted from the Partium Find App as well as Inquiry ID and Requester’s email.
- “Mark request as Not Resolved” button: This button allows an expert to cancel the request. After confirmation, this button notifies the person who requested this help that it could not be resolved.
- Part to Confirm [auto]: in case the submission was of the type Confirm Part (see types of requests in Get started with the Expert Help Requests) there is a specific section that shows the thumbnail (if available) alongside the ID and Name of the part the user asked to confirm. By clicking on this area, the details of the Part to Confirm are shown on the right pane. Click back to return to the list of results.
- Entered Text Query [auto]: Text query that was used to perform the search in the Partium Find App.
- User-generated Photos: the image that was used to perform the search in the Partium Find App is marked with the badge “Query Image” [auto]. The user may have added additional images (not used for querying the system) through the app. A maximized version is displayed by clicking on any of the thumbnails of those images.

- Performed search [auto]: Filters that were used to perform the search in the Partium Find App.
- User-selected locations in Bill of Materials [auto]: provides the list of the locations in the BoM that the user selected to filter out the results. The list is presented with the path to each selected location.
- Comment from User: Further information input by the user in their submission.
- Request language [auto]: Language in which the user created the request in the app.
C. Part Detail Page
- Multiple Images (if available): Images can be enlarged by clicking on their thumbnail.
- Part ID: click on the button to copy the ID to the clipboard of your computer.
- Confirm this part: this button allows to confirm a part. See How to confirm a part for an Expert Help Request for a complete explanation of that step.
Other fields are also displayed if available and according to access permissions. See Manage part attribute permissions for more details.